
Unlocking the Power of VS Code Agent Mode
Instruction & Prompt Files for the AI-Augmented Software Engineer


In March, Microsoft released VS Code version 1.99—and with it came two big updates for developers using AI. First, you can now use your own API keys to connect different language models in Copilot chat, giving you more freedom to choose your favorite AI tool. But even more exciting was the introduction of Agent Mode: a completely new way to code with AI as your assistant.
How Agent Mode Transforms the Way You Code
Agent mode lets you to ask you LLM to handle a big itself. It can plan the steps, choose which files to create or change, update code, use tools, and run commands in the terminal. Yes, there is much to unpack about the new powerful agent mode in VS Code.
In essence, agent mode uses different tools and changes code to complete the task you give it. In its most basic form, an AI agent has reasoning and reacting features, as described in the React Framework; see the schematic below. Nowadays, agents have many more features. Examples are reasoning, planning, observing, and self-refining. In doing so, the VS Code agent mode can plan a high-level task, observe context, call and use multiple tools, and refine its answers.

Of course, there is probably more magic happening under the hood of Copilot, which we do not yet know. And to be fair, a true magician does not tell his secrets 😉.
What’s in the Toolbox?
Currently, Copilot has many tools ready to use as soon as you start. Some of the most fun and useful ones let Copilot create folders and files, and run commands in your terminal.
For example, if you want to add a new feature to your to-do app and put it in a new file inside its own folder, Copilot in VS Code can help. It can make the folder structure, create the file, add the code for the feature, and even run the file in the terminal—all at once.
There is another cool tool in agent mode: it can show the changes it makes. Whether it changes files or code, you can see them in VS Code like a merge request. You can then choose to accept or remove the changes made by Copilot.
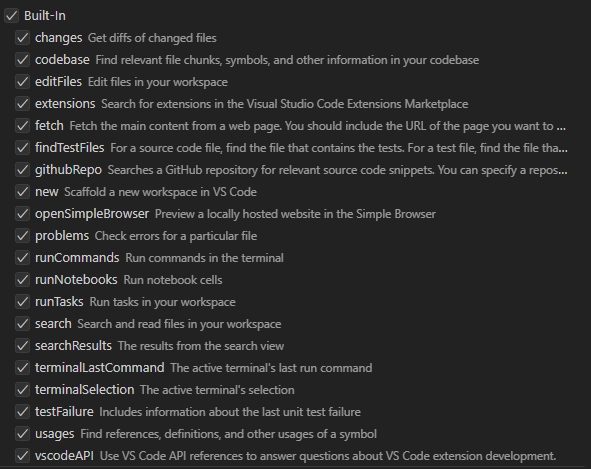
To sum up, there are many useful tools that the AI Agent has access to. See the list below for an overview.
But there are even more exciting features in the new agent mode! One of the most important is support for MCP (Model Context Protocol) servers. MCP gives our AI agent a standard way to connect with outside tools, apps, and even data sources.
And that’s not all. We can also use reusable prompts and custom instructions to improve how Copilot answers us. In the rest of this blog, we will talk about prompt files and custom instructions in Copilot agent mode. Don’t worry—we’ll explain MCP in more detail in another blog. We’ll show what it is, how it works, and how it can help make your Copilot agent even stronger.
Leveraging Prompt Files in VS Code
As a developer or data engineer, you often have to do the same setup or write the same basic code again and again, even in difficult or special projects. These repeated tasks take a lot of time and leave less time for work that is truly interesting or creative.
You may have already made helpful prompts to save time on these tasks. But saving and sharing these prompts with your team can be hard. Often, you have to copy and paste prompts from different files or chat apps again and again, which slows you down even more.
For example, you might have written a prompt that helps you quickly add new API features in your To-do app. A prompt like this might look like:
Create a new GET endpoint in the existing .NET Web API for retrieving a list of todo items. Ensure proper validation, error handling, and responses formatted as JSON.Executing this prompt using the Copilot Agent in VS Code produces exactly what you specified: a complete GET endpoint with validation and error handling as shown in the screenshot:

Creating and Using Prompt Files
However, Instead of repeatedly copying and pasting this prompt, you can improve your workflow by saving it as a Prompt File within VS Code.
Here's how you can set this up:
Press
CTRL + SHIFT + Pin VS Code.Type and select "Chat: New prompt file".
Choose a location to store the prompt file (we touch on this later) and paste your prompt.
Save the file, for example, as
addTodoEndpoint.md.
---
mode: agent
---

Create a new GET endpoint in the existing .NET Web API for retrieving a list of todo items. Ensure proper validation, error handling, and responses formatted as JSON.
Once stored, you call it in your Copilot chat by typing a forward slash (`/`), followed by the prompt name:
/addTodoEndpointThis already represents a notable productivity boost compared to manual copying and pasting. However, VS Code's Prompt Files become even more powerful through dynamic variables.
Utilizing Variables for Dynamic Prompt Files
Prompt Files become more useful when you use dynamic variables. Variables help you make your prompts more general, so you can use them in many situations without changing them.
For example, instead of always writing the GET method, you can use a variable for the HTTP method.
Here, the variable follows the following signature: ${input:variableName:placeholder}
---
mode: agent
---
Create a new ${input:method:GET} endpoint in the existing .NET Web API for TODO items. It should allow users ${input:action:to retrieve a list of todo items}.
Ensure proper validation, error handling, and JSON-formatted responses.
This dynamically created POST endpoint precisely matches your prompt specifications, as demonstrated in the Copilot output shown here:
/addTodoEndpoint method=POST action="add a todo item"
Contextualizing Prompts with Selected Text
Prompt Files can further leverage contextual information directly from your editor. For example, you can add selected text from your To-do app’s code directly into your prompt by using the ${selectedText} variable. This helps Copilot understand the context better and build code that matches your current style:
---
mode: agent
---

Create a new ${input:method:GET} endpoint in the existing .NET Web API for TODO items. It should allow users ${input:action:to retrieve a list of todo items}.
Ensure following the same structure as the selected endpoint below:

${selectedText}
To use this, simply highlight the reference code block in your editor before invoking the prompt:
/addTodoEndpoint method=DELETE action="delete a todo item"
The suggested code from Copilot matches the structure of the previously crafted POST request.
Making AI Work Your Way: Customizing Copilot’s Brain
In the previous section, we saw the power of VS Code's Copilot agent mode and how we can use prompt files for efficiënt development. Now, some of you might think: "But Copilot doesn’t follow the coding rules we use in our projects." The good news is that we can fix this by using custom instructions. These help Copilot give better answers that match your coding rules and also make your prompts shorter. You can set custom instructions in different ways in VS Code: by using instruction files or by adding them to your user or workspace settings.
Crafting Effective Instruction Files
You can make and save your own instructions in your workspace or code project using a file called .github/copilot-instructions.md file. In this file, you can explain how you like to write code, which tools you use, and what your project needs. Use Markdown to format the text. These instructions only work in the workspace or project where the file is saved. When you open the Copilot chat, VS Code will automatically use the instruction file you made as part of the chat context.

We have created a sample instruction file below to illustrate how to use instruction files. This file includes instructions for naming conventions, documentation guidelines, and general preferences.
---
applyTo: '**'
---
Coding standards, domain knowledge, and preferences that AI should follow.
# Coding Standards for Todo App
## Naming Conventions
- Use `PascalCase` for class, interface, and method names (e.g., `TodoItem`, `AddTask`, `ITodoRepository`).
- Use `camelCase` for local variables and method parameters (e.g., `taskId`, `dueDate`).
- Use `ALL_CAPS_WITH_UNDERSCORES` for constants (e.g., `DEFAULT_PRIORITY`, `MAX_TASKS_PER_USER`).
- Prefix private fields with an underscore (e.g., `_isCompleted`, `_taskList`).
## Documentation Guidelines
- All public classes and methods must have XML documentation comments summarizing their purpose and usage in the context of the todo app.
- Include parameter and return value descriptions in method documentation, especially for methods like `AddTask`, `CompleteTask`, or `GetPendingTasks`.
## General Preferences
- Prefer explicit types over `var` unless the type is obvious from the right-hand side.
- Use consistent indentation (4 spaces per level).
- Limit line length to 120 characters.
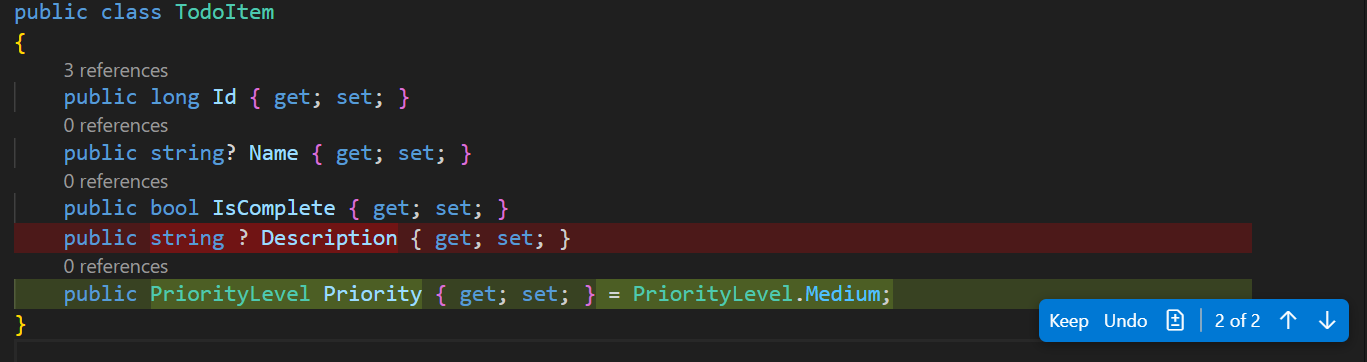
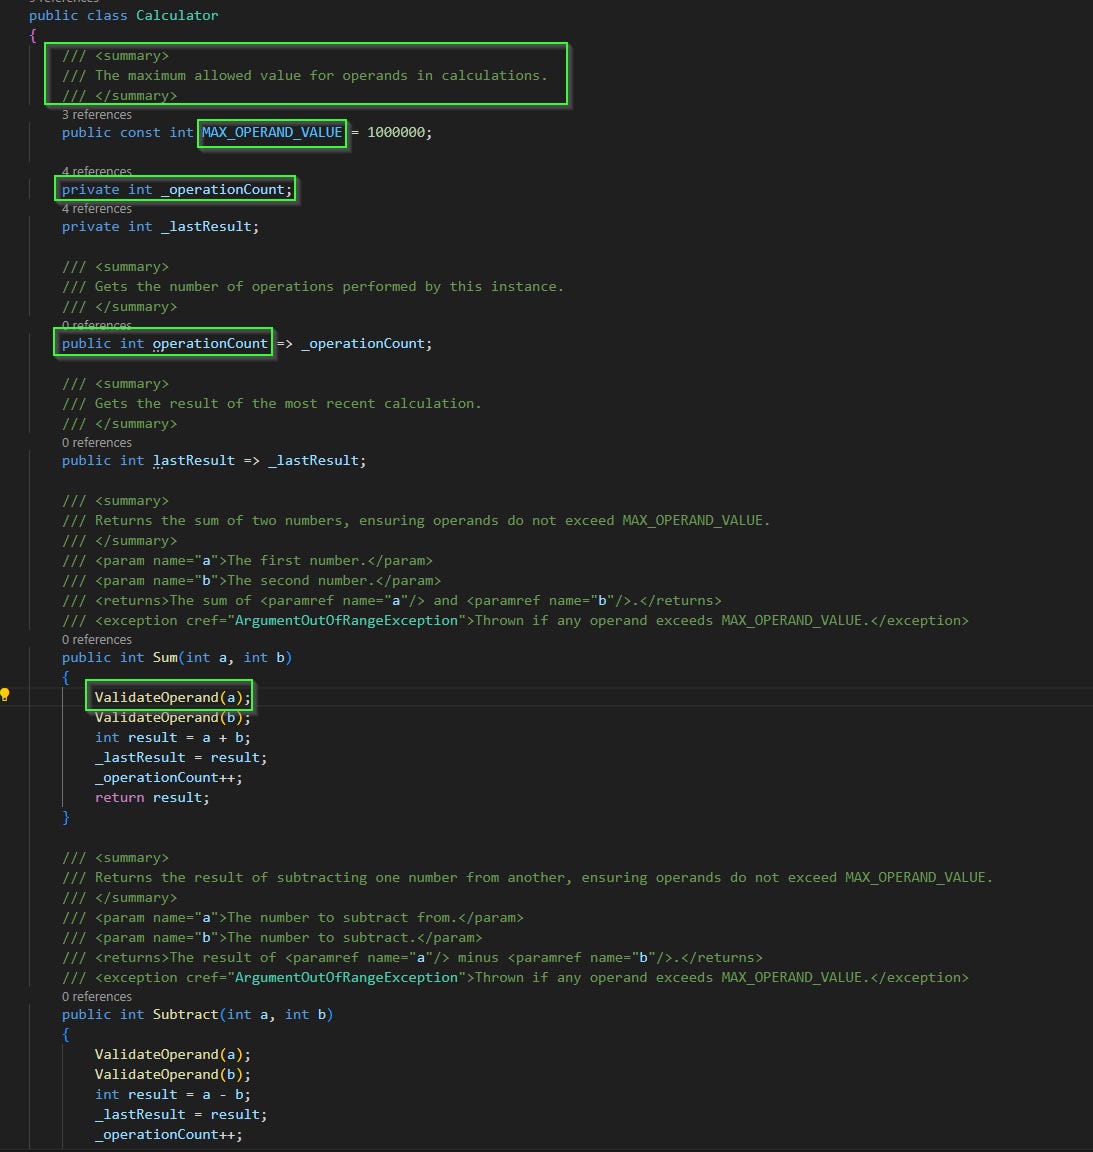
- Organize `using` statements alphabetically and remove unused imports.To see if this instruction prompt works, we asked Copilot agent the following prompt:
I want a calculator class with methods for summing, subtracting, and multiplying. Also add a constant for the max operand value to make sure the input values are not higher than this value. Also add the following private fields that need to be used in the calculator class:

- an operation count: to track how many operations have been performed by this instance
- a last result: store result of the most recent calculation.
The result of this prompt is shown below. As you can see, Copilot has added documentation, constants, PascalCasing, camelCasing, and private variables according to the instructions file we created.
VS Code Settings
With the VS Code settings, we can see how useful custom instructions are. If we open your Workspace Settings (JSON) in VS Code, we can give custom instructions for specific Copilot features, like the testGeneration, commitMessageGeneration, and much more. These instructions change how Copilot normally works. This way, we can adjust each feature of Copilot to work just how we want.
Targeted Instructions for Test Generation
To show how useful targeted instructions can be, we will now write tests for the Calculator class we created earlier. Since we want to follow good coding practices, we’ll use the AAA testing pattern (Arrange, Act, Assert). We also want to write our function names using snake_case. So, we will use the following instruction:
 "github.copilot.chat.testGeneration.instructions": [

        {"text": "A test should follow the AAA (Arrange, Act, Assert) pattern. And use snake_case for function names."}

    ],
Now, we ask Copilot to generate tests for our multiplication function in our Calculator class. Below, we see one of the resulting test functions, where the AAA pattern is followed and the snake_case pattern is also used.

Targeted Instructions for Commit Message Generation
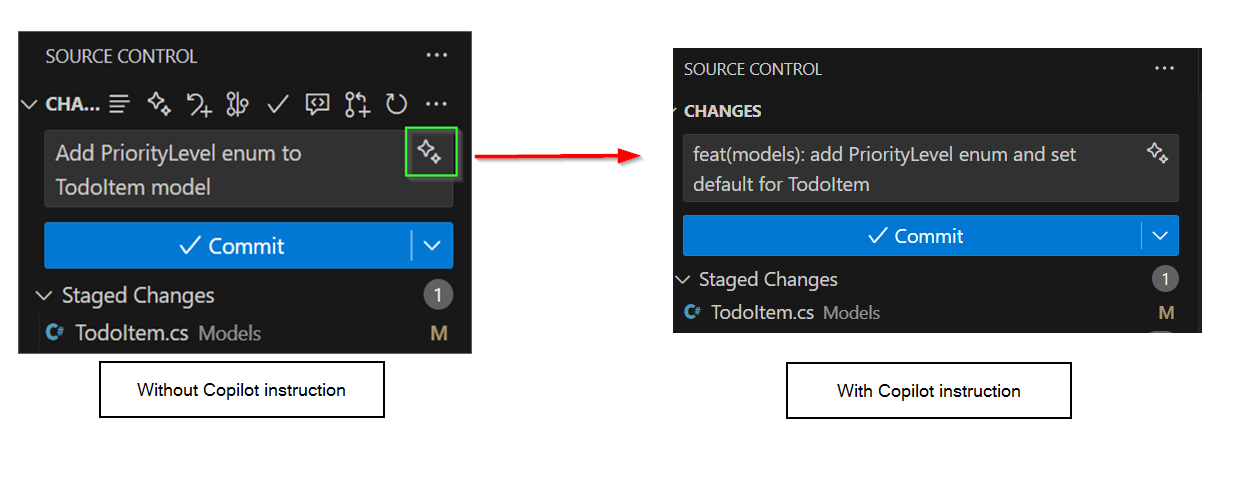
There is a cool but somewhat hidden feature in Visual Studio Code that many people haven’t noticed yet. When you open the Source Control panel and hover over the small sparkle icon next to your commit message, you can let GitHub Copilot create a commit message for the changes you’ve staged.
Copilot uses Git to see the changes and summarizes them. Maybe your team uses a particular commit message style, and this initial commit message generation might not be for you. But this is where the power of custom instructions comes into play again. If we open our Workspace Settings (JSON) in VS Code again, we can give custom instructions for the commitMessageGeneration. In the example below, we added instructions describing how you would follow the conventional commit messaging style.
 "github.copilot.chat.commitMessageGeneration.instructions": [

        {

            "text": "Write a clear and structured commit message using the format <type>[optional scope]: <description>, choosing an appropriate type (e.g., feat, fix, docs, refactor, etc.) and using present tense in the description. Avoid punctuation at the end."

        }

    ],
Now, if we generate a new commit message, Copilot will use these new instructions and TADA. We see that Copilot follows our instructions and uses the conventional commit message styling we talked about earlier.
Managing and Versioning Prompt Files in VS Code
Earlier, we touched upon the challenge of managing different versions of prompts. Thankfully, VS Code offers built-in solutions for this issue. You’ve already seen that VS Code prompts you to choose a location when saving your prompts. Let's explore the various storage options available and their benefits.
Local Storage
If you mostly use prompts on your own computer and don’t work closely with others, saving your prompt files locally might be enough. The main disadvantage is that other people won’t be able to access your prompts, which makes it harder to collaborate. But there is a big advantage if you often switch between different projects on the same computer: your prompts will always be available no matter which project you’re working on. This makes it easier and faster to reuse helpful templates or utility prompts.
Version Control Using a .github Folder
A more organized and team-friendly way is to put your prompts in a .github folder at the main level of your project, next to common folders like src or .git. This method works well with Git version control. It lets you track changes, work together easily, and share prompts with your team. When you change your prompts or instructions, the updates are included in your commits, so the history is saved and teamwork is smoother.
Combining Version Control and Team Accessibility
Using a .github folder can be helpful for projects on GitHub. But if your team mainly works on another platform, like Azure DevOps, it might not feel as natural. A .github folder in a project that doesn't use GitHub could lead to confusion or make the project feel messy.
To avoid this, you can create a separate repository just for your team’s or organization’s prompt and instruction files. This way, everything stays organized, version control is easier, and teams can share files without making project folders harder to understand.
Your shared repository structure might look something like this:
prompt-files-repo/
├── generalPrompts/
│   ├── domain-info.md
│   └── generic-form-prompt.md
├── teamApple/
│   ├── prompts/
│   └── instructions/
├── teamBanana/
│   ├── prompts/
│   └── instructions/
└── teamCitrus/
    ├── prompts/
    └── instructions/
This structure enables you to:
Easily share generic prompts and instructions relevant across multiple teams (e.g., domain-specific guidelines, reusable form generation prompts).
Clearly organize team-specific prompts and instructions separately, ensuring each team can efficiently manage their own resources without clutter.
Having all team prompts and general prompts in the same repository makes it easy for team members to explore and reuse useful prompts created by other teams, reducing duplicated effort and fostering collaboration.
Integrating the Shared Repository into Your Workflow
Suppose you're a member of Team Apple. You’ll want to configure VS Code to easily access both your team's prompts and the general prompts. To achieve this:
Navigate to your VS Code settings using the command palette (
CTRL + SHIFT + P) and select or directly accessvscode://settings/chat.promptFiles.Configure your VS Code to point explicitly to your relevant directories:
PATH_TO_REPO/generalPrompts
PATH_TO_REPO/teamApple/prompts
After this configuration, invoking prompts within Copilot chat using the forward slash (/) command will show both the general prompts and your team-specific prompts:

With this setup, your team benefits from organized, accessible prompts with robust version control, enabling smoother collaboration, knowledge sharing, and improved productivity.
Final Thoughts
At Machine Thoughts, we like to share the useful things we learn, the small wins we have, and the new tools we find as engineers in today’s fast-changing tech world. One clear example is how Agent Mode, custom instructions, and prompt files in VS Code are quietly but deeply changing how we work with generative AI.
As we keep testing and learning, we’re looking at how these tools can help us—and you—work smarter, automate boring tasks, and make more room for real creativity. We’re still learning a lot, and many questions remain. How do you move a prompt into an instruction file in the best way? How useful is MCP in your daily work? And how can we make AI tools feel like true teammates, not just smart extras?
We don’t have all the answers yet, but we’re excited to learn more—together. So stay curious and keep building. We’ll keep sharing what we learn, one step at a time.